Showing posts with label Colorado Springs Portrait Artist. Show all posts

Friday, October 14, 2016

Baby Isla

This sweet little portrait was a long time in coming. I started it months before it was eventually completed. In between the beginning and the end was a flurry of commissions that demanded my attention. At last I was finally able to give it the attention that was required to finish it.
Baby Isla
14 x 18", Oil on canvas
Rita Salazar Dickerson
Stage 1: Sketching in the composition.  I tinted the canvas first and then with the same thinned paint I loosely painted in the figure.
Stage 2: Painting the head and shoulders.  Knowing that this was the first layer, I blocked in the major shapes and colors -- painting wet-on-wet, or alla prima.
Stage 3: The body, arms and legs were next. 

Stage 4: Painting the foreground, background, fabric and basin. My biggest challenge was to paint just enough information to make the cloth and basin believable. I also paid attention to my edges as I painted the background and foreground. 
Stage 5: Adding more details to the background. My goal was to keep this composition simple but I kept feeling like she was so alone in this big, empty room. After much deliberation, I added the shower curtain along with the corner wall and bottom portion of the bathtub.
Final Stage: Completing the painting. One of the many final touches was the baseboard on the wall behind her. It seemed to complete the "frame" around her. From there I checked values, edges and color and made necessary adjustments. 

Monday, June 8, 2015

Portrait Commission of Two Women

At first glance, an oil portrait like this might simply look like a picture of two beautiful smiling people sharing a happy moment. But through the years I have learned and experienced that a portrait is not just a portrait. It is much more than that.

All portraits have one thing in common. They have a story to tell. This story begins (like all my previous portrait commissions) as a story about cherished loved ones who are being honored. And as the process begins one thing leads to another. Special memories are awakened that stir the viewer's heart and uplift the spirit. Emotions resurface that perhaps had laid dormant for a while. Loved ones are thought of and admired. A family heirloom is created.

There is power in a portrait.
Mrs. Dianne Rhodes and Her Mother, Mrs. Emma Mae Grimes
18 x 24", Oil on canvas
Rita Salazar Dickerson

Once the decision for the commission had been made the excitement and planning began. There were lots of reference photos to study and analyze. This is the main reference photo I chose to work from though I used several others as well. Many questions were asked from my clients. "What size should the canvas be? How long will the process take? What about the framing? Can we use a linen liner?" I enjoy this process; its exciting for me as well.

I love the freedom of making changes and using the photos for reference only. Adjustments were to be made with lighting, composition, clothing, jewelry...its all fun!
I started the painting with a thin mixture of burnt umber and mineral spirits which I used to paint in freehand the contour lines of their images. From there I worked on Mrs. Rhodes' (on the left) face first and then moved on to her mother's.
Half of the lovely large necklace was covered by Mrs. Grimes' dress and so I revealed the full piece for balance and design.

The black dresses were nice for continuity but I wasn't sure how I wanted to complete them. I then blocked in Mrs. Grimes' hair, preparing for the waves that would add contrast with light and shadow.
At this stage I focused on the details...completing the hair...softening edges...hi-lighting the jewelry...

...details that make a big difference. At my client's request I added Mrs. Rhodes' hidden right earring. I think it was a good suggestion.


With input from my clients, the final decision was made to complete the dresses to the edge of the canvas along with other minor adjustments throughout the entire painting.

Once the completed portrait is approved it is either picked up by the client or delivered to their home. But this story had a different ending.

The date was set. Every small detail was carefully planned. A surprise dinner party was to be held in honor of Mrs. Rhodes.

I had the extra special pleasure of being invited to the unveiling in Atlanta, Georgia and was asked to take part in the presentation.
                                                                                                                                                            Photo credit to Josef M. Courtney


To my right is Ms. Cherita Lewis, and to my left is Mr. and Mrs. C.R. Rhodes

It was a special blessing to be there and an evening I will never forget.


Thursday, February 12, 2015

My Second Corporate Portrait: Part One

There are so many layers in the art world. The formal portrait is one of them. I meet many artists who, for various reasons, prefer not to go there. Regardless of the naysayers I have always been intrigued by the historical use of formal portraits as well as the challenge to paint them.  As Aristotle stated," The aim of Art is to present not the outward appearance of things, but their inner significance; for this, not the external manner and detail, constitutes true reality." (I wish I could have been the first person to say that.)

One of my most recent goals was to add two formal business/corporate portraits to my portfolio. This is my second one.
Stage 1: Painting in the image. After tinting the canvas with a thinned mixture of Transparent Oxide Red and Ultramarine Blue, I used that same mixture to lightly paint in Conor's likeness freehand.
Detail of the face.
Stage 2: Painting the face. I begin this stage the same way I would if I were painting from life instead of using a reference photo: lightly brushing in the shape of the head with a thin layer of paint as I familiarize myself with the features.
Stage 3: The eyes. The eyes tell the story. In this first attempt I aim for accuracy in shape, color and light.
Stage 4: Blocking in the face. As I apply this layer of paint I pay attention to the planes of the face as I develop the likeness through light, contrast and shadow.
Stage 5: Blending the colors. Once the paint is on the canvas I move the it around with my brush, pulling colors and values into each other so that they transition well.
Stage 6: Completing the first layer (underpainting). This is my last step -- blocking in the remaining shapes and colors of his face before I can complete it. 
Stage 7: Completing the face. I applied thicker paint for the second layer and then blended the colors and values together so that they transitioned well from light to dark and warm to cool colors.
Stage 8: Blocking in the tie and shirt.
Stage 9: Completing the shirt and tie. The intricate design on this silk tie almost intimidated me. I decided to squint my eyes and paint my impression of it.


Friday, December 26, 2014

Dog Portrait Commission

Dog Portrait Commission
12 x 16", Oil on canvas
Rita Salazar Dickerson (c)2014
These past several weeks have been extra busy with travel mixed in with painting and pen and ink sketches. Today I'd like to share a fun commission that I had the pleasure of creating for a new client who wanted to make this portrait a Christmas gift surprise.

All of the preliminary work for this painting was done via email. After the initial inquiry, a variety of photographs were sent to me; I was given the freedom to create from those and work on the composition from there.

This is the photo I used as my main reference photo. As you can see, the ears on both dogs were cropped and by using the additional photos, I was able to paint them back in. Also, the photo was a bit dark in places and so I enjoyed the artistic freedom of adding light and color that I saw in some of the other photos.

.
Stage 1: The sketch. I approach every initial sketch for a portrait painting as though I am painting from life and so I paint it freehand, using the eyes as reference points for the rest of the features. Getting the angles and likeness right is very important at this stage. I really liked the pose of these two pooches; the way their beautiful faces came closely together, leaning into each other, was endearing.
Stage 2: Blocking in the main colors. Another nice touch to this painting was the way the the two dogs complimented each other with the color and markings of their coats. Because of some of their similar colors I was able to paint each of the dogs simultaneously. In this layer I did not worry about details and texture, instead I focused on their main shapes of color.


Stage 3: Completing the painting. This final layer is always pure fun for me. I enjoy applying thick paint with a palette knife and then moving it around with a coarse haired paint brush. Colors are enhanced and details applied. The final touches involved a small, fine paintbrush that gave me the ability to paint in the suggestions of their whiskers. 

The background was also a blast. My client requested light blue, grayish colors with touches of yellow. That was an easy request to fulfill since the colors of the dogs had already lent themselves to that type of background as a nice option.

Painting commissions are always an honor for me. To be a part of a story where kindness and generosity is involved is so special.


Friday, August 15, 2014

Formal Portrait: Business Portrait, Part 3

The hardest part about a portrait like this is setting down the paintbrush and walking away. There are so many aspects of it that I want to study and analyse. For now its time to let it "rest" for a couple of weeks and then come back and look at it with fresh eyes. Adjustments will be made then for the final completion.

David P. Kunstle
30 x 24, Oil on canvas
Rita Salazar Dickerson


Stage 6: Blocking in the hands with a first layer of paint. As with everything else, I try to look at the hands as shapes  instead of palms, thumbs and fingers, squinting my eyes to generalize form, shadow and light.  For me, painting hands can become very mental. Fear often sets in and then I freeze up, questioning every step of the process. And then I start talking to myself. "Trust your instincts. Remain calm and keep painting!"


Stage 7: Completing the hands and pants. After the hands I focused on the pants. This was a perfect time to paint them since my wet edges would work right into the fresh paint of the hands and blend much easier.
 Stage 8: Blocking in the background. I looked at the background as one piece. I started from the top and worked my way down placing the first layer of paint as precisely as I could so that my second and final layer would be easier.
 
Stage 9:  Completing the background. While the first layer was still wet I kept going and added the details of the second and final layer. I wish you could see it in person. Right now the paint is very wet and so it was hard to photograph clearly. Please check my website in a few weeks to see the completed portrait.

Wednesday, December 11, 2013

Family Portrait Painting: Part 9 - Completion

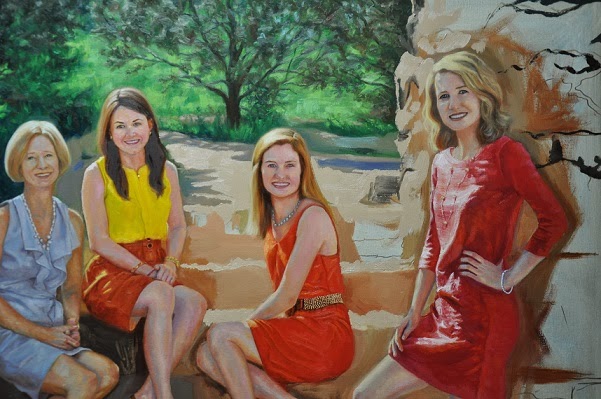
It was an ideal August morning in Colorado Springs. The air was still and the sky was bright blue. I had come to this park the day before (with my daughter and granddaughter) to check out various places in the park that would work for staging a family portrait. I paid close attention to the time as we walked from place to place to see what the sun was doing and where the light would fall on the shoulders of my subjects.
And so for the Johnsons, it was an enjoyable stroll through the park as we walked from one place to another, laughing and joking but still focused on what we were there to do, photograph them for this portrait.
Stage 24: Painting the lower stone steps. I enjoyed the variations in the stone steps. Once I blocked this area in with a solid color (the under painting), I came back in with a palette knife while it was still wet. I kept reminding myself to stand back and look at it from a distance just to make certain that the end result was realistic.
Stage 25: Blocking in and then completing the stone steps. I felt almost giddy when I realized how close I was to completing this painting. These stones were generally darker and rougher in texture than the others and so the under painting was darker as well.
The Johnson Family
36 x 48", oil on canvas
Rita Salazar Dickerson (c)2013
Stage 26: Completing the foreground. Although this photograph does not give an accurate representation of the colors in the foreground, (there are also warmer tones of browns, and rusts) I think you can see the textures I created with a palette knife to give it the feeling of small stones and gravel mixed in with sticks and dead grasses on the left. As with all of my paintings, I will look at this again in a couple of weeks to make any necessary adjustments and take a final photograph.

Wednesday, December 4, 2013

Family Portrait Painting: Part 8

Rocks, rocks, rocks. I spent the last couple of days and and both evenings painting rocks. Their variety of textures and colors were challenging and fun. But along with the time it took patience. The challenge was not just the painting of them, but making them fit into the composition realistically. I didn't want the stones to overwhelm the subjects. It kind of felt like I was painting rocks into a puzzle, making sure each piece fit around legs, arms and hair...
Stage 20: Blocking in the rocks. The simplest way to approach this challenge was to break each section into shapes and form, light and dark, blocking it in with flat color using a larger brush. "No reason to panic or feel overwhelmed", I told myself. "Just take it on, one section at a time".
Stage 21: Painting wet-on-wet. After the shapes were blocked in on the steps I came back in with more paint and additional color, creating the illusion of the steps and the path in the background. From there I worked on the stone wall behind Laurel.

 Stage 22: Painting with a palette knife. For the large stones I started with a brush and then realized the palette knife would be much easier to achieve the effect I was after of rough and smooth stones.

Detail of the stone path.


Stage 23: Completion of the stone wall.

Detail of the stone wall.

Another close-up of the stone wall.

Wednesday, November 27, 2013

Family Portrait Painting: Part 7

Its late and I'm tired, but I really wanted to get this post in before the Thanksgiving holiday tomorrow. I took painting breaks today to make cornbread for the stuffing, a pie crust, and then a pumpkin pie.

Stage 18: Painting the background. I started first by blocking in the main shapes of color on the bush behind Steve and Patty.
Stage 19: Continuing with the background. Knowing that the paint would still be wet from working on the bush last night, I got up early this morning and continued so that the paint would still be workable, wet-on-wet. From there I kept going, blocking in the light green behind the tree and then doing the tree and branches last. I love the light; its everywhere in this painting. And it always amazes me the way a background can  dramatically change the dynamics of a portrait(s).
 To my readers in the United States, Happy Thanksgiving!

Thursday, November 21, 2013

Family Portrait Painting: Part 6

At last, I am here, working on Laurel, the final figure in this family portrait. Completing a figure a week in this painting at times seemed like a lofty goal when I have had multiple projects going on at the same time. But I did it and am so happy to be at this point. Relieved, really.

Stage 14: Painting Laurel's face. I used the same method of working wet-on-wet as I did with the other family members. Working on one subject after another with the same light source allowed me to get a similar approach going with each of them. I thought this would help me get faster with each one but it didn't. It still took me a similar amount of strokes and problem solving moments to get the features just right and the lighting and colors accurate. Because Laurel was standing closer to the camera, I had to adjust her size to fit in with the composition. Reference photos are helpful but not accurate when it comes to size and proportions. The camera lens had made her unrealistically larger than the rest.

Stage 15: Painting the red dress. If you follow the visual progression of Laurel's dress in these next few photos, you can see how I blocked in the shapes of the shadows and light with large simple strokes of color.

Stage 15...continued. The light, shadows and folds create visual movement in her dress.

Loading my brush with nice, thick paint (about the consistency of mayonnaise) and creating the final effects of light on the front of her dress was so much fun. I love being able to see the brush strokes. It is entertaining to the viewer.

While the paint was still fresh, I took a deep breath and painted her delicate necklace and its shadows.
 
Stage 16And then from there it was time to paint her arms and hands. Once again, the jewelry added so much to this composition. Eye catching details...yes!

Stage 17: Painting Laurel's legs, feet and sandals. I kept adding more color to her legs and then decided to hold off and not do any more until the background is painted in. Then, adjustments will be made to everyone I'm sure.
Painting in the background will add an entirely new dimension to this group portrait. I can hardly wait!