Showing posts with label Colorado Portrait Artist. Show all posts

Monday, April 3, 2017

The Copyist Program: Washington D.C.

I had a dream and then I had an adventure. I met new people, faced new challenges and worked hard to accomplish my goal. And through it all I learned so much.

Let me back up a bit and say that for years, each time I had the privilege of visiting the National Gallery of Art in Washington D.C. I would see the empty easels in some of the gallery rooms neatly placed out of the way but still very noticeable. Each one looked like they were waiting for someone. Curious, I asked at the information desk what the easels were for. That question was the first of many that eventually led me through the application process for their Copyist Program. Once accepted my excitement grew as I anticipated the portrait I had requested to paint. There were so many paintings to choose from but I had always admired and studied the work of John Singer Sargent. In the art world he has long been someone I respected because of his strong brush strokes and ability to confidently paint the likeness of fabric with such efficiency. I knew his portrait of Mrs. Henry White would be a difficult challenge (her life size portrait was quite intimidating) but I decided that I might as well go for it and see what happens.

Setting up my canvas made my heart beat faster. I was surrounded by greatness. To paint in this atmosphere where the walls were adorned with actual historical masterpieces almost took my breath away. My dream was about to come true.

I worked quickly sketching in her likeness with a thin wash of paint.

Once the sketch was done I began painting her face -- using her features as my reference for the rest of the painting. 

My excitement grew as I began studying her dress by laying down paint with values, colors and strokes as Sargent had. My goal was to copy it as closely as possible so that I could learn from Sargent's method. He was my instructor speaking to me through this painting; I tried to pay attention to everything he said.

Time was running out. By this stage I was at the beginning of the last day of my extraordinary adventure. When I chose this portrait my goal was not to do a complete the copy but to see how far I could go with a portion of it. 

Each hour in front of that easel seemed like ten minutes. Visitors from all over the world would come and go, occasionally asking questions and taking photos of me and my progress. I especially enjoyed the groups of school children who politely asked me about my work and the Copyist program.

I was allowed to paint from 10:00 a.m. until 4:00 p.m. each day. Four o'clock came quickly on my fifth and final day. I wasn't expecting to even begin to paint her right hand so that was an extra treat. Her gold bracelet on her left wrist was also a lot of fun. I loved Sargent's attention to detail when he applied it to her face and jewelry and then surprised me with the light and contrast that brought out the beauty of her satin and tulle dress.

What a an absolute blessing and privilege this was! I can hardly wait to go back and apply what I have been taught to a new painting. Perhaps another Sargent?

Friday, October 14, 2016

Baby Isla

This sweet little portrait was a long time in coming. I started it months before it was eventually completed. In between the beginning and the end was a flurry of commissions that demanded my attention. At last I was finally able to give it the attention that was required to finish it.
Baby Isla
14 x 18", Oil on canvas
Rita Salazar Dickerson
Stage 1: Sketching in the composition.  I tinted the canvas first and then with the same thinned paint I loosely painted in the figure.
Stage 2: Painting the head and shoulders.  Knowing that this was the first layer, I blocked in the major shapes and colors -- painting wet-on-wet, or alla prima.
Stage 3: The body, arms and legs were next. 

Stage 4: Painting the foreground, background, fabric and basin. My biggest challenge was to paint just enough information to make the cloth and basin believable. I also paid attention to my edges as I painted the background and foreground. 
Stage 5: Adding more details to the background. My goal was to keep this composition simple but I kept feeling like she was so alone in this big, empty room. After much deliberation, I added the shower curtain along with the corner wall and bottom portion of the bathtub.
Final Stage: Completing the painting. One of the many final touches was the baseboard on the wall behind her. It seemed to complete the "frame" around her. From there I checked values, edges and color and made necessary adjustments. 

Sunday, July 3, 2016

Pastel Portrait Commission

I'm comfortable painting portraits in oil. Even though learning and growing as an artist is a never ending journey, I realize its easy to slip into a rut and do the creative process the same way every time. Therefore it was a nice challenge for me to work in pastel again. My brain had to wake up, look around and be alert. It was refreshing to pick up chalk instead of a brush...to press and rub and play with layers of color on paper.

Baby Girl Portrait Commission
14 x 11 inches, Pastel on Paper
Rita Salazar Dickerson

Painting a portrait with pastels seemed so appropriate for this beautiful baby girl. I was able to create soft lines and edges that matched the mood of this commission.


After lightly laying my first contour lines down, I began working with her eyes before moving down to her nose and then the rest of her face. It's so much easier not to smudge this way. I try to complete as much as possible the first time around so that I don't have to keep going in and reworking it.


 My client kindly sent this photo to me of the portrait matted and framed. A well chosen frame is such an important part of the completed pastel. I was so happy with the results.

Sunday, June 28, 2015

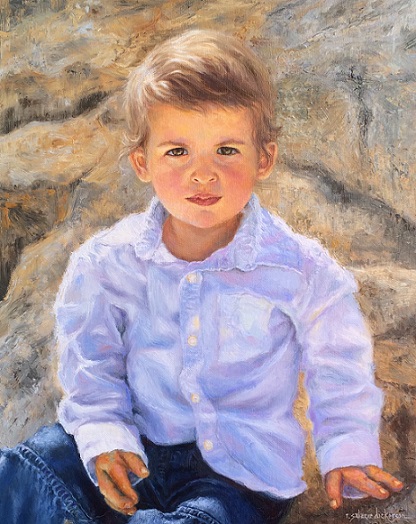
Portrait of a Little Boy

When it was time to photograph two year old CJ for his portrait I wondered if he would get the significance of what we were trying to accomplish. Turns out, he did. Maybe it was the crisp white shirt (that soon crumpled and folded under his constant movement) and the large camera lens pointed at him. Or perhaps it was his older sister's oil portrait already hanging in his home that helped CJ understand that it was his turn. Regardless of the reason, CJ slowed down that sunny morning and followed instruction. I took tons of photos while he rested on that rock -- taking in his surroundings.

CJ loves the outdoors and rocks (throwing them is a favorite pastime.) And so it seemed appropriate that both of these elements would be a part of his portrait.

CJ
20 x 16", Oil on canvas
Rita Salazar Dickerson
Stage 1: Painting the contour lines. I painted CJ's image with loose contour lines using a mixture of Ultramarine Blue and Transparent Earth Red thinned with mineral spirits. My biggest challenge at this stage was to slow down and study him as I worked on his features.

Stage 2: Starting with the eyes...Once I felt like I had his likeness I began painting the eyes, the focal point in this portrait.
Stage 3: Completing the face. After the eyes I moved on to the rest of his face. Because the back lighting from the sun is slightly to his upper right, I realized that everything on his left side is slightly darker in value.
Stage 4: Painting the shirt. I started his shirt by blocking in the darker shades of blue resting in the folds and creases.
Stage 5: Completing the shirt. Once the darker values were in I began filling in the rest of his shirt with lighter shades of blues, purples, yellow and even some shades of pink.
Stage 6: Painting the shirt and hands. When I was at a good stopping point with the shirt it was time to move on to his hands and blue jeans. Keeping the variations of the edges is important and it helps to work wet on wet.

Stage 7: Painting the hair and ears. I started this step by painting in some of the background so that the outer edges of his hair would be soft. Working with wet paint makes this step so much easier.
Stage 8: Painting the background and completing the painting. I used a palette knife to apply some of the paint in the background. It helped create a rough and rugged feel of the rocks. I then used a brush to move some of that paint around and blend the colors together.

When the painting was at this point, I left it alone for about a week and then came back in and reworked pretty much everything. (Taking out some detail, adding color, removing too much color in places, changing values, softening some edges...it's all part of my process.)

Monday, June 8, 2015

Portrait Commission of Two Women

At first glance, an oil portrait like this might simply look like a picture of two beautiful smiling people sharing a happy moment. But through the years I have learned and experienced that a portrait is not just a portrait. It is much more than that.

All portraits have one thing in common. They have a story to tell. This story begins (like all my previous portrait commissions) as a story about cherished loved ones who are being honored. And as the process begins one thing leads to another. Special memories are awakened that stir the viewer's heart and uplift the spirit. Emotions resurface that perhaps had laid dormant for a while. Loved ones are thought of and admired. A family heirloom is created.

There is power in a portrait.
Mrs. Dianne Rhodes and Her Mother, Mrs. Emma Mae Grimes
18 x 24", Oil on canvas
Rita Salazar Dickerson

Once the decision for the commission had been made the excitement and planning began. There were lots of reference photos to study and analyze. This is the main reference photo I chose to work from though I used several others as well. Many questions were asked from my clients. "What size should the canvas be? How long will the process take? What about the framing? Can we use a linen liner?" I enjoy this process; its exciting for me as well.

I love the freedom of making changes and using the photos for reference only. Adjustments were to be made with lighting, composition, clothing, jewelry...its all fun!
I started the painting with a thin mixture of burnt umber and mineral spirits which I used to paint in freehand the contour lines of their images. From there I worked on Mrs. Rhodes' (on the left) face first and then moved on to her mother's.
Half of the lovely large necklace was covered by Mrs. Grimes' dress and so I revealed the full piece for balance and design.

The black dresses were nice for continuity but I wasn't sure how I wanted to complete them. I then blocked in Mrs. Grimes' hair, preparing for the waves that would add contrast with light and shadow.
At this stage I focused on the details...completing the hair...softening edges...hi-lighting the jewelry...

...details that make a big difference. At my client's request I added Mrs. Rhodes' hidden right earring. I think it was a good suggestion.


With input from my clients, the final decision was made to complete the dresses to the edge of the canvas along with other minor adjustments throughout the entire painting.

Once the completed portrait is approved it is either picked up by the client or delivered to their home. But this story had a different ending.

The date was set. Every small detail was carefully planned. A surprise dinner party was to be held in honor of Mrs. Rhodes.

I had the extra special pleasure of being invited to the unveiling in Atlanta, Georgia and was asked to take part in the presentation.
                                                                                                                                                            Photo credit to Josef M. Courtney


To my right is Ms. Cherita Lewis, and to my left is Mr. and Mrs. C.R. Rhodes

It was a special blessing to be there and an evening I will never forget.


Wednesday, February 18, 2015

My Second Corporate Portrait: Part Two

It's always a relief when I reach this point in a portrait. Its time to leave the head alone and focus on the clothing.
Stage 10: Painting the suit coat. Painting a black suit coat with a single light source is a great opportunity to study values. I brushed in the darkest value first. I mixed two parts of Ultramarine Blue to one part Transparent Oxide Red to achieve the black that I needed.
And then I worked in the lighter values. The next step was to blend the lights and darks at their edges to that they transitioned well with soft edges.
Stage 11: The hands. I started the hands by blocking in the light and dark shapes. This underpainting helped me see their shapes in the simplest of terms.
Working wet on wet paint, I then applied the second layer with additional color and values.

Conor McCluskey
BombBomb, CEO
36 x 24", Oil on canvas
Rita Salazar Dickerson

Thursday, February 12, 2015

My Second Corporate Portrait: Part One

There are so many layers in the art world. The formal portrait is one of them. I meet many artists who, for various reasons, prefer not to go there. Regardless of the naysayers I have always been intrigued by the historical use of formal portraits as well as the challenge to paint them.  As Aristotle stated," The aim of Art is to present not the outward appearance of things, but their inner significance; for this, not the external manner and detail, constitutes true reality." (I wish I could have been the first person to say that.)

One of my most recent goals was to add two formal business/corporate portraits to my portfolio. This is my second one.
Stage 1: Painting in the image. After tinting the canvas with a thinned mixture of Transparent Oxide Red and Ultramarine Blue, I used that same mixture to lightly paint in Conor's likeness freehand.
Detail of the face.
Stage 2: Painting the face. I begin this stage the same way I would if I were painting from life instead of using a reference photo: lightly brushing in the shape of the head with a thin layer of paint as I familiarize myself with the features.
Stage 3: The eyes. The eyes tell the story. In this first attempt I aim for accuracy in shape, color and light.
Stage 4: Blocking in the face. As I apply this layer of paint I pay attention to the planes of the face as I develop the likeness through light, contrast and shadow.
Stage 5: Blending the colors. Once the paint is on the canvas I move the it around with my brush, pulling colors and values into each other so that they transition well.
Stage 6: Completing the first layer (underpainting). This is my last step -- blocking in the remaining shapes and colors of his face before I can complete it. 
Stage 7: Completing the face. I applied thicker paint for the second layer and then blended the colors and values together so that they transitioned well from light to dark and warm to cool colors.
Stage 8: Blocking in the tie and shirt.
Stage 9: Completing the shirt and tie. The intricate design on this silk tie almost intimidated me. I decided to squint my eyes and paint my impression of it.