Sunday, January 12, 2014

Landscape Painting: Mt. Daly, Part 2

 Stage 2Painting the sky. I started the sky by blocking it in with a somewhat thin layer of light gray-blue. While the paint was still fresh and wet, I painted the white clouds into it, softening the edges as I went. I enjoyed the subtle hints of pinks and lavender.
There was a fluffy, light cloud cover in the sky that morning, somewhat unusual for a Colorado summer morning. More often than not, its a solid blue sky. The random pattern of the openings in the clouds intrigued me with little bits of blue peeking through.
Stage 3: Painting the trees into the sky. To get the effect I wanted, painting wet paint onto wet paint, I realized that I had to paint at least the tops of the trees that overlapped and framed the edges of the sky.
Stage 4: Blocking in Mt. Daly. As we came upon this wilderness scene, with Mt. Daly looming in the distance, I was impressed with the light and how it was enhancing the colors of this peak. As I blocked in the colors I couldn't help thinking of it as a patchwork quilt.
Stage 5: Painting Mt. Daly. I loved what the clouds and sunlight were doing as random patterns of shadow and light moved across the mountain's form. The biggest challenge was giving enough visual information to make it interesting and believable but at the same time keeping it simple enough so that it didn't look tight and too detailed.

Saturday, January 4, 2014

Landscape Painting: Mt. Daly, Part 1

Every January I look forward to the new year with excitement and anticipation. What will 2014 hold? Some of it is planned in advance with goals that have been in place for several months. I enjoy the new challenges. For example, I am ready to begin in earnest my "Colorado Landscape" series with an exhibit scheduled in early May at G44 Gallery. I am also looking forward to some commissioned portraits. And then there are the surprises. Paintings in my future that right now I am totally unaware of. Creative surprises in the new year. What will they be?

The first oil commission of this year falls right in line with my new landscape series. It brings back special memories of the backpacking trip my husband Robert and I took last summer. The reference photo for this painting was taken on the first day. I was so excited and in awe of the beauty that surrounded me. Before we had even reached the trail head I was captivated by this view: Mt. Daly looming straight ahead, welcoming me to the Maroon Bells-Snowmass Wilderness in the White River National Forest.
Stage 1: Mt. Daly. Sketching in the composition freehand with a thin wash of Ultramarine Blue and Transparent Earth Red mixed with mineral spirits. This stage always seems like it can be loosely done but in reality I force myself to take great care and really think through the composition. This is a good time to do some problem solving while mentally creating a plan of action. My natural impulse it to rush through this stage telling myself that I will fix it later. While that is possible, it always takes more time and wastes energy.

Sunday, December 29, 2013

Angel Christmas Ornaments

 I've had angels on my mind this Christmas season. Ever since I painted angels on stage in Lincoln, Nebraska earlier this month, I have thought about angels. They are so much a part of the Christmas story. And so when it came time to create my annual ornaments for my family, I decided to paint something similar to my "Musical Angels" but with a personal twist: the angels would represent each loved one. It was fun pulling out my pen and ink, using the quill pen as well as a small brush to depict each of them. I enjoy working with ink; the colors are vibrant and fun. I personalized the inside of the card by adding the family names and the year, 2013. From there I punched holes and added ribbon so that they could be easily hung from the tree.


Friday, December 20, 2013

Performance Painting: "Musical Angels"

When I am not painting in my studio, I enjoy painting on stage.

In early October of this year I received an email from the music director of a church in Lincoln, Nebraska. He had seen the YouTube video of me painting my "Musical Angels" and was in the process of planning special events for the December services. He asked if I was available to come and paint the angels. I am so glad that I was!

I flew into Lincoln on a Thursday, bought the canvases, paints and supplies and was ready for rehearsal with the band on Saturday.
When I am about to paint on stage, beginning and completing a painting in a short amount of time in front of a live audience (this time I had about 17 or 18 minutes), I am always amazed that there is this large blank canvas before me that will soon be transformed with the help of brushes, paint and prayer .
I begin my preparations about an hour before I paint, squeezing out plenty of acrylic paint and mixing it with a medium (to keep it from drying out too soon). The colors have been planned so that I already know what I am going to need.
I was given a copy of the "run" sheet so that I knew the plan for the service. 
Painting to beautiful music is one of the most exhilarating and creatively satisfying experiences. I feel like the music enters in through my brushes and flows out on to the canvas. The music becomes part of the painting and then the painting becomes part of the music. For this particular service I painted to live as well as recorded music. What was really fun for me was being able to complete this painting to "Adiemus", the same music that was on my YouTube video.
And then suddenly its over. The music stops, the brushes are set down and I walk away, grateful for the experience.
Merry Christmas everyone!

Wednesday, December 11, 2013

Family Portrait Painting: Part 9 - Completion

It was an ideal August morning in Colorado Springs. The air was still and the sky was bright blue. I had come to this park the day before (with my daughter and granddaughter) to check out various places in the park that would work for staging a family portrait. I paid close attention to the time as we walked from place to place to see what the sun was doing and where the light would fall on the shoulders of my subjects.
And so for the Johnsons, it was an enjoyable stroll through the park as we walked from one place to another, laughing and joking but still focused on what we were there to do, photograph them for this portrait.
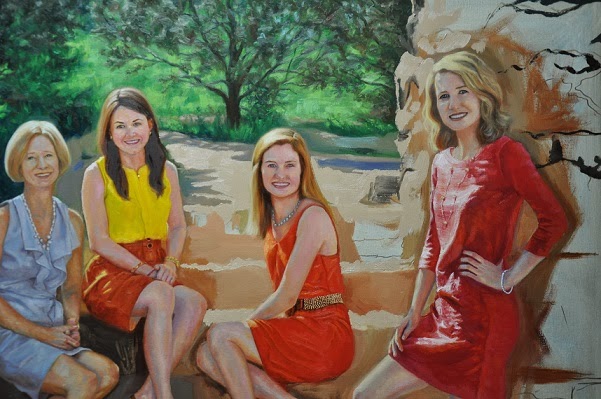
Stage 24: Painting the lower stone steps. I enjoyed the variations in the stone steps. Once I blocked this area in with a solid color (the under painting), I came back in with a palette knife while it was still wet. I kept reminding myself to stand back and look at it from a distance just to make certain that the end result was realistic.
Stage 25: Blocking in and then completing the stone steps. I felt almost giddy when I realized how close I was to completing this painting. These stones were generally darker and rougher in texture than the others and so the under painting was darker as well.
The Johnson Family
36 x 48", oil on canvas
Rita Salazar Dickerson (c)2013
Stage 26: Completing the foreground. Although this photograph does not give an accurate representation of the colors in the foreground, (there are also warmer tones of browns, and rusts) I think you can see the textures I created with a palette knife to give it the feeling of small stones and gravel mixed in with sticks and dead grasses on the left. As with all of my paintings, I will look at this again in a couple of weeks to make any necessary adjustments and take a final photograph.

Wednesday, December 4, 2013

Family Portrait Painting: Part 8

Rocks, rocks, rocks. I spent the last couple of days and and both evenings painting rocks. Their variety of textures and colors were challenging and fun. But along with the time it took patience. The challenge was not just the painting of them, but making them fit into the composition realistically. I didn't want the stones to overwhelm the subjects. It kind of felt like I was painting rocks into a puzzle, making sure each piece fit around legs, arms and hair...
Stage 20: Blocking in the rocks. The simplest way to approach this challenge was to break each section into shapes and form, light and dark, blocking it in with flat color using a larger brush. "No reason to panic or feel overwhelmed", I told myself. "Just take it on, one section at a time".
Stage 21: Painting wet-on-wet. After the shapes were blocked in on the steps I came back in with more paint and additional color, creating the illusion of the steps and the path in the background. From there I worked on the stone wall behind Laurel.

 Stage 22: Painting with a palette knife. For the large stones I started with a brush and then realized the palette knife would be much easier to achieve the effect I was after of rough and smooth stones.

Detail of the stone path.


Stage 23: Completion of the stone wall.

Detail of the stone wall.

Another close-up of the stone wall.

Wednesday, November 27, 2013

Family Portrait Painting: Part 7

Its late and I'm tired, but I really wanted to get this post in before the Thanksgiving holiday tomorrow. I took painting breaks today to make cornbread for the stuffing, a pie crust, and then a pumpkin pie.

Stage 18: Painting the background. I started first by blocking in the main shapes of color on the bush behind Steve and Patty.
Stage 19: Continuing with the background. Knowing that the paint would still be wet from working on the bush last night, I got up early this morning and continued so that the paint would still be workable, wet-on-wet. From there I kept going, blocking in the light green behind the tree and then doing the tree and branches last. I love the light; its everywhere in this painting. And it always amazes me the way a background can  dramatically change the dynamics of a portrait(s).
 To my readers in the United States, Happy Thanksgiving!