Monday, August 3, 2015

Beginners Drawing Class

I'm enjoying this new "season" of my life where teaching has been woven into my life as an artist. Almost everyone, it seems, wants to learn how to paint and last November I readily agreed to teach an introductory class to painting. One class led to another and it has been fun watching students find joy and satisfaction in the creative process of painting.

But many eager new artists are unaware of the fact that drawing is the foundation of painting. To become a better painter, one must learn how to draw. Rarely do I meet those who are wanting to fine tune their drawing skills. Learning to draw well requires time, concentration and dedication. And bravery. So I was excited to see such an enthusiastic response to a Beginners Drawing Class. Some were there to revive their love for drawing. Others had never taken a drawing class before but had always wanted to give it a try. After three action packed hours of instruction, I was quite pleased with the results. Students drew and drew well!
Photo credit: Annie Stevens
There were about 36 students that gathered on a Saturday morning in June to learn the basics of drawing.

Photo credit: Annie Stevens
Value scales were discussed and created.

Photo credit: Annie Stevens
And then I pulled out my radishes. Yes, radishes.
Photo credit: Annie Stevens
They were drawn quickly at first and then with more time and study.
Photo credit: Annie Stevens
And then, before I knew it, there were beautiful drawings of radishes all around me.
Photo credit: Annie Stevens
From radishes we moved on to hats. I placed a hat at the center of each table and using a single light source, everyone drew the hat in front of them. As you can see from this photo, the hat portion of my class was quite successful. Marvelous hat drawings surrounded me when only a short time before there was blank paper. Each person there experienced the challenge and beauty of creating something from nothing.

I am always moved by the power of art. 

Sunday, June 28, 2015

Portrait of a Little Boy

When it was time to photograph two year old CJ for his portrait I wondered if he would get the significance of what we were trying to accomplish. Turns out, he did. Maybe it was the crisp white shirt (that soon crumpled and folded under his constant movement) and the large camera lens pointed at him. Or perhaps it was his older sister's oil portrait already hanging in his home that helped CJ understand that it was his turn. Regardless of the reason, CJ slowed down that sunny morning and followed instruction. I took tons of photos while he rested on that rock -- taking in his surroundings.

CJ loves the outdoors and rocks (throwing them is a favorite pastime.) And so it seemed appropriate that both of these elements would be a part of his portrait.

CJ
20 x 16", Oil on canvas
Rita Salazar Dickerson
Stage 1: Painting the contour lines. I painted CJ's image with loose contour lines using a mixture of Ultramarine Blue and Transparent Earth Red thinned with mineral spirits. My biggest challenge at this stage was to slow down and study him as I worked on his features.

Stage 2: Starting with the eyes...Once I felt like I had his likeness I began painting the eyes, the focal point in this portrait.
Stage 3: Completing the face. After the eyes I moved on to the rest of his face. Because the back lighting from the sun is slightly to his upper right, I realized that everything on his left side is slightly darker in value.
Stage 4: Painting the shirt. I started his shirt by blocking in the darker shades of blue resting in the folds and creases.
Stage 5: Completing the shirt. Once the darker values were in I began filling in the rest of his shirt with lighter shades of blues, purples, yellow and even some shades of pink.
Stage 6: Painting the shirt and hands. When I was at a good stopping point with the shirt it was time to move on to his hands and blue jeans. Keeping the variations of the edges is important and it helps to work wet on wet.

Stage 7: Painting the hair and ears. I started this step by painting in some of the background so that the outer edges of his hair would be soft. Working with wet paint makes this step so much easier.
Stage 8: Painting the background and completing the painting. I used a palette knife to apply some of the paint in the background. It helped create a rough and rugged feel of the rocks. I then used a brush to move some of that paint around and blend the colors together.

When the painting was at this point, I left it alone for about a week and then came back in and reworked pretty much everything. (Taking out some detail, adding color, removing too much color in places, changing values, softening some edges...it's all part of my process.)

Monday, June 8, 2015

Portrait Commission of Two Women

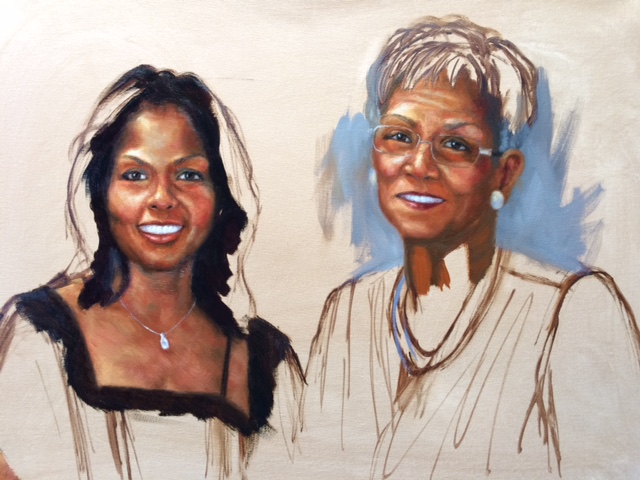
At first glance, an oil portrait like this might simply look like a picture of two beautiful smiling people sharing a happy moment. But through the years I have learned and experienced that a portrait is not just a portrait. It is much more than that.

All portraits have one thing in common. They have a story to tell. This story begins (like all my previous portrait commissions) as a story about cherished loved ones who are being honored. And as the process begins one thing leads to another. Special memories are awakened that stir the viewer's heart and uplift the spirit. Emotions resurface that perhaps had laid dormant for a while. Loved ones are thought of and admired. A family heirloom is created.

There is power in a portrait.
Mrs. Dianne Rhodes and Her Mother, Mrs. Emma Mae Grimes
18 x 24", Oil on canvas
Rita Salazar Dickerson

Once the decision for the commission had been made the excitement and planning began. There were lots of reference photos to study and analyze. This is the main reference photo I chose to work from though I used several others as well. Many questions were asked from my clients. "What size should the canvas be? How long will the process take? What about the framing? Can we use a linen liner?" I enjoy this process; its exciting for me as well.

I love the freedom of making changes and using the photos for reference only. Adjustments were to be made with lighting, composition, clothing, jewelry...its all fun!
I started the painting with a thin mixture of burnt umber and mineral spirits which I used to paint in freehand the contour lines of their images. From there I worked on Mrs. Rhodes' (on the left) face first and then moved on to her mother's.
Half of the lovely large necklace was covered by Mrs. Grimes' dress and so I revealed the full piece for balance and design.

The black dresses were nice for continuity but I wasn't sure how I wanted to complete them. I then blocked in Mrs. Grimes' hair, preparing for the waves that would add contrast with light and shadow.
At this stage I focused on the details...completing the hair...softening edges...hi-lighting the jewelry...

...details that make a big difference. At my client's request I added Mrs. Rhodes' hidden right earring. I think it was a good suggestion.


With input from my clients, the final decision was made to complete the dresses to the edge of the canvas along with other minor adjustments throughout the entire painting.

Once the completed portrait is approved it is either picked up by the client or delivered to their home. But this story had a different ending.

The date was set. Every small detail was carefully planned. A surprise dinner party was to be held in honor of Mrs. Rhodes.

I had the extra special pleasure of being invited to the unveiling in Atlanta, Georgia and was asked to take part in the presentation.
                                                                                                                                                            Photo credit to Josef M. Courtney


To my right is Ms. Cherita Lewis, and to my left is Mr. and Mrs. C.R. Rhodes

It was a special blessing to be there and an evening I will never forget.


Monday, May 18, 2015

Peonies: Painting Class

There is something to be said for creating something colorful, soothing and beautiful where only hours before there was a blank canvas and some tubes of paint. Painting from life teaches me so much more than a photo ever can. I love the entire process, from choosing the flowers at the market to setting them up in my studio with just the right light. When I am painting, I am lost in moments of color, texture and movement.

This fresh new painting project was in preparation for my beginners painting class at Woodmen Valley. I realized that painting peonies might seem like a daunting task for the beginner painter, but what a fun way to jump into painting; color, simple shapes and value brushed onto canvas in just three short hours. Our goal was not to create a masterpiece for each student but to learn the power of paint, touch on the academics of composition and to have fun applying paint to canvas. I think we can all learn something about ourselves if we dare to step out of our comfort zones and try something new.
Peonies
20 x 16", Acrylic on canvas
Rita Salazar Dickerson
Stage 1: Setting up the still life composition. It was a rather dark, rainy day but I was determined to paint from the natural southern light coming from my studio window. I arranged the three flowers following some simple composition guidelines that I could later explain to my painting class.

Stage 2: Painting in the lines of my composition. Using a thinned mixture of alizarin crimson and white, I broke the painting down into thirds.
Stage 3: Painting the flowers. Thinking in terms of thirds, even in the values of the flowers, I painted them with a light, medium and dark pink. With a single natural light source from the window, seeing the three values was much easier.
Stage 4: Completing the painting. Once the flowers were done, I focused on the leaves, the foreground and background all at once. With acrylic, working wet on wet, I had to work fast so that my background and foreground edges worked in well with the flowers, the leaves and stems before the paint dried.  Each leaf was 3 to 4 strokes. I put the main color of green down and then added the lights and darks of reds and yellows.  I had fun adding the colors from the flowers and integrating them into the background and foreground.

With the painting complete, I was ready to teach the class.
First, I started the class with 8 x 10" canvas boards to create a color study. This starts the thinking process regarding color and composition. It also helps get the jitters out.

After spending a half hour or so on the color studies, we pulled out the 20 x 16" canvases and got to work creating the actual painting.

 By the end of the second hour, colorful, fun peonies filled the class!
 I walked around the class and started taking photos of all the great paintings that were being created right before my eyes. Enjoy scrolling down and seeing the variety of beautiful results.


Standing back and looking at all the multiple paintings of the peonies took my breath away. Each art student's style and personality emerged. We are all unique, like our paintings.


Here are some favorite quotes I jotted down while I was at the Art of the Portrait conference in Atlanta, Georgia a couple of weeks ago.

"I like to paint order out of chaos...It doesn't matter how large or how small (your painting is) its gotta be beautiful and intentional." Quang Ho

"I look for passion, imagination and the means to communicate...Use all of your experiences, emotions, your life situation and put that in your paintings." Everette Raymond Kinstler