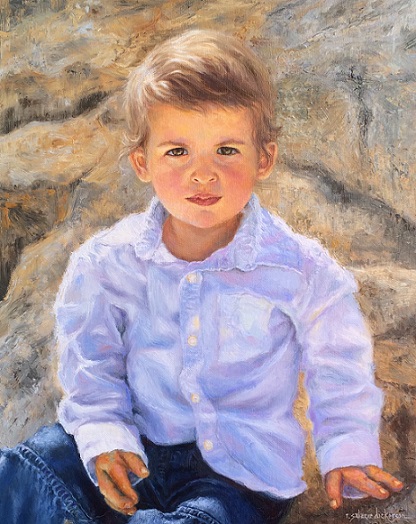
When it was time to photograph two year old CJ for his portrait I wondered if he would get the significance of what we were trying to accomplish. Turns out, he did. Maybe it was the crisp white shirt (that soon crumpled and folded under his constant movement) and the large camera lens pointed at him. Or perhaps it was his older sister's oil portrait already hanging in his home that helped CJ understand that it was his turn. Regardless of the reason, CJ slowed down that sunny morning and followed instruction. I took tons of photos while he rested on that rock -- taking in his surroundings.
CJ loves the outdoors and rocks (throwing them is a favorite pastime.) And so it seemed appropriate that both of these elements would be a part of his portrait.
 |
CJ
20 x 16", Oil on canvas
Rita Salazar Dickerson |
 |
| Stage 1: Painting the contour lines. I painted CJ's image with loose contour lines using a mixture of Ultramarine Blue and Transparent Earth Red thinned with mineral spirits. My biggest challenge at this stage was to slow down and study him as I worked on his features. |
 |
| Stage 2: Starting with the eyes...Once I felt like I had his likeness I began painting the eyes, the focal point in this portrait. |
 |
| Stage 3: Completing the face. After the eyes I moved on to the rest of his face. Because the back lighting from the sun is slightly to his upper right, I realized that everything on his left side is slightly darker in value. |
 |
| Stage 4: Painting the shirt. I started his shirt by blocking in the darker shades of blue resting in the folds and creases. |
 |
| Stage 5: Completing the shirt. Once the darker values were in I began filling in the rest of his shirt with lighter shades of blues, purples, yellow and even some shades of pink. |
 |
Stage 6: Painting the shirt and hands. When I was at a good stopping point with the shirt it was time to move on to his hands and blue jeans. Keeping the variations of the edges is important and it helps to work wet on wet.
|
 |
| Stage 7: Painting the hair and ears. I started this step by painting in some of the background so that the outer edges of his hair would be soft. Working with wet paint makes this step so much easier. |
 |
Stage 8: Painting the background and completing the painting. I used a palette knife to apply some of the paint in the background. It helped create a rough and rugged feel of the rocks. I then used a brush to move some of that paint around and blend the colors together.
When the painting was at this point, I left it alone for about a week and then came back in and reworked pretty much everything. (Taking out some detail, adding color, removing too much color in places, changing values, softening some edges...it's all part of my process.) |


No comments:
Post a Comment